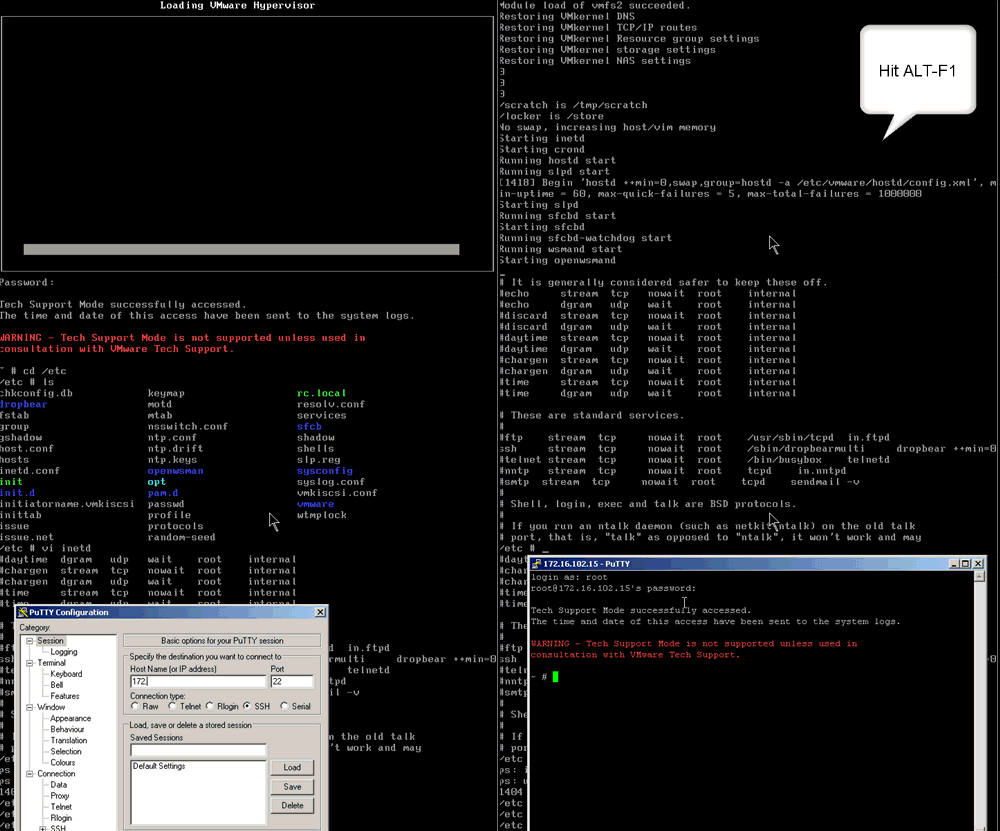
As you probably know ESX 3i is the embedded version of ESX, mainly run from usb flash disks build-in servers from HP, Dell, IBM and FSC, but you can also install this on your own servers. I really love this version as it is so easy and simple and adds extra (and less) functionality to ESX. The main thing about 3i is that the Red Hat service console has been removed and replaced by a small busybox linux version. To keep this service console tiny, 3i comes with build-in hardware monitoring, something a normal ESX server does not have. When connecting to a 3i server with your VC client you can see fan speeds and temperatures in your system and you can of course put alarms on them, in case something breaks.
By default the 3i server gives us no access to this small service console, but there are some down sides to this, as certain things can only be done from the service console. And until VMware builds those missing functionalities into the VC interface you still need to get yourself console access. In the beta versions of 3i there was an option in the advanced settings, but this has been removed in the final releases. VMware has published a knowledge base article that describes how to get console access (this is not officially supported by VMware). In short you just hit Alt-F1 and then type in ‘unsupported’ followed by the root password. The article also explain how to disable this Tech Support Mode, in case you want to.

(the password that is asked is the password for root)
Of course you do not want to be in the server room all the time and your server might not have some kind of remote access facility, so the first thing you probably want to do is enable SSH access to your server.
# edit /etc/inetd.conf (using vi)
# remove the # (remark) sign in front of the SSH line
# kill and restart the inetd process (or just reboot your server)
So why do you need console access?
There are multiple reasons why you want to have console access. One of the most common reasons is that you might want to change HBA driver options. To get better performance out of your Qlogic or Emulex HBA most people increase their queue depth (see for instance VMware 100.00 io blog post). To find out what options you can set on your drivers you can use the command vmkload_mod:
# display your loaded drivers: vmkload_mod –list
# display parameters for your driver: vmkload_mod -s /mod/your_driver
Another reason why you definitely still need console access (unfortunately) is if you want to use thin provisioned virtual disks, a new feature in ESX, but for some reason not exposed in the VC interface yet (i think because it is still experimental supported). Any virtual disks created via the normal interface are pre-allocated disks, so a 100GB virtual disk will use 100GB on your VMFS. With thin provisioned disks the actual virtual disk file will start very small and only grow when you will actually need the disk space. Note: this only works for Virtual Disks on iSCSI and FC SAN, not NFS!
With the vmkfstools command you can create new virtual disks as ‘thin’ disks. After you created the disks, you can then use the normal VC interface to add that disk to your VM.
Creating a 100GB thin disk:
vmkfstools -c 100G -d thin /vmfs/volumes/san_vmfs/my_vm/thin_disk.vmdk
If you already have a pre-allocated disk, you can convert it to a thin disk as well. Well it is not really converting, but creating a new copy as thin disk. After you have done that, you will need to remove the old disk from the VM and add the new converted copy.
‘convert’ copy a existing virtual disk to thin format:
vmkfstools -i /vmfs/volumes/san_vmfs/my_vm/large_disk.vmdk -d thin /vmfs/volumes/san_vmfs/my_vm/new_thin_disk.vmdk
Well I am sure there are more reasons why you still want to ‘play’ on the service console. As I grew up with a commodore 64 I always want a command prompt (but I’m glad we lost the tape drive 😉 )
Thanks to www.run-virtual.com for this info.
Leave a Reply