IT

Zimbra: High CPU spikes every 1 minute 292 121 Roderick Derks

Zimbra: High CPU spikes every 1 minute

This article describes the actions I took over the years to improve the CPU usage of Zimbra in my Virtual Machine running on VMware ESX. I’m using Zimbra since 2007.

Zimbra Version 5.0.14 (2008)

I encountered a problem on my VM which is running Zimbra .
Every 1 minute I got a cpu spike of around 70% to 80% 24hrs a day and I don’t know why. Looks lika a JAVA process is responsible for this when I watch TOP output. I would like to get rid of this!

changes that did not help:
– ‘Sleep time between subsequent mailbox purges’ from 1 minute to 1 hour

– fetchmail from 1 minute to 5 minutes

– disabling or editing cronjobs:

#*/2 * * * * /opt/zimbra/libexec/zmstatuslog  #*/10 * * * * /opt/zimbra/libexec/zmdisklog  #00,10,20,30,40,50 * * * * /opt/zimbra/libexec/zmlogprocess > /tmp/logprocess.out 2>&1  00,20,40 * * * * /opt/zimbra/libexec/zmlogprocess > /tmp/logprocess.out 2>&1  #0,10,20,30,40,50 * * * * /opt/zimbra/libexec/zmqueuelog  10,30,50 * * * * /opt/zimbra/libexec/zmqueuelog

– “$ zmloggerctl stop” did not help

– vi /opt/zimbra/libexec/zmlogprocess

#my $rawRetention = `${zimbra_home}/bin/zmprov -l gacf | egrep '^zimbraLogRawLifetime' | sed -e 's/zimbraLogRawLifetime: //'`;    my $rawRetention = "31d";  #my $summaryRetention = `${zimbra_home}/bin/zmprov -l gacf | egrep '^zimbraLogSummaryLifetime' | sed -e 's/zimbraLogSummaryLifetime: //'`;    my $summaryRetention = "730d";


But then I found it. The zmmtaconfig has a watchdog process that will run every sixty seconds and restart services if they have crashed. I haven’t had the services crash so I changed the value to five minutes. If you care about uptime should a service crash you shouldn’t change this. However depending on when the service crashed it could be restarted sooner than five minutes.

# su - zimbra # zmlocalconfig -e zmmtaconfig_interval=300

..

This is what someone else configured to overcome these problems and boost performance:

su – zimbra
zmlocalconfig -e zmmtaconfig_interval=6000
zmprov mcf zimbraLogRawLifetime 7d
zmprov mcf zimbraLogSummaryLifetime 30d
/opt/zimbra/libexec/zmlogprocess

su – zimbra
crontab -e
*/60 * * * * /opt/zimbra/libexec/zmstatuslog

Zimbra Version 6.0.1 (2009)

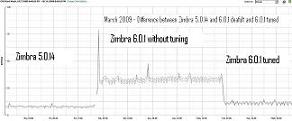
After updating Zimbra 5.0.14 to 6.0.1 I ran into a same sort of problem again. The zimbralogger was using the CPU like crazy.
I executed the folowing command to stop te logging process and CPU went down from 50% with to 5% flat(!):

$ su - zimbra $ zmprov ms fill_in_your_hostname -zimbraServiceEnabled logger

Then as the root user edit /etc/logrotate.d/zimbra and comment out all logger related start / reload commands e.g.

#      su - zimbra -c "/opt/zimbra/bin/zmswatchctl restart" > /dev/null 2>&1 || true #      su - zimbra -c "/opt/zimbra/bin/zmlogswatchctl start"

Now I got a great load average once again: 0.03, 0.10, 0.21


Zimbra Version 6.0.7 (20 aug 2010)

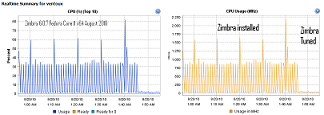
Still the same issues after installing v 6.0.7 on a Fedora Core 11 x64 virtual machine on ESX4.1. Applied the same tricks to bring down CPU usage.
 

Zimbra Version 7.0.0 (07 febr 2011)

Looks like the problem is solved in version 7.0.0, read more here. I upgraded from version 6.0.10 and the cpu spikes are not there anymore.. And finally an upgrade introduced some new interesting features.

Zimbra Version 7.1.4 (febr 2012) and 7.2.0 (june 2012)

Got the problem again in 7.1.4. Really annoying. An upgrade to 7.2.0 also did not solve this. Only things that helped:

  1. # su – zimbra
    # zmconfigdctl stop
    # zmlocalconfig -x | grep zmmtaconfig
    zmmtaconfig_enable_config_restarts = true
    zmmtaconfig_interval = 6000
    zmmtaconfig_listen_port = 7171
    zmmtaconfig_log_level = 3
    zmmtaconfig_watchdog = FALSE
    Problem not solved, just a small improvement.
  2. Installed a new version of Zimbra 7.2 on Centos 6.2 (instead of Fedora 11) and migrated the mailboxes. This was the only thing I could do that finally solved the very annoying problem. Not good.

Zimbra Version 8.0.2 (febr 2013)

After upgrading from 7.2.0 to 8.0.2 I just had to adjust the crontab file as user zimbra to reduce the repetitive tasks that are planned every 5 and 10 minutes. The CPU is very low.

Zimbra is curently running on Centos 6.2 (minimal install) on VMware 5.1 on a SSD disk.
VMware and NAS: Freenas or Openfiler? 150 150 Roderick Derks

VMware and NAS: Freenas or Openfiler?

This artice describes my Freenas experiences since march 2009.

From VMware Server to ESXi and a NAS solution (March 2009)

December 2008 after using VMware Server for 3 years I decided that it was time to switch to ESXi. That was a good moment to start experimenting with a NAS. And offcourse because my network is very low budget I was looking for a free open source alternative that could run on simple hardware.By the way, in these three years of using VMware Server to host my website and emailserver at home, I just had two reboots for maintenance reasons. Uptime of the virtual and physical servers was over 300 days 🙂

My setup:
– Two ESX servers: Pentium4 2GB RAM and each one has a 1GB NIC.
– Server used to install FreeNas and OpenFiler: Pentium4, 1GB RAM, 1GB NIC
– Switch 1GB
 

FreeNas

I started with installing FreeNas as I played with this software in the past. When installing I was pleasently surprised by the options that FreeNas offered me. You can boot it from the cd, install it on the harddrive and boot it from there, or install it on an USB drive and then boot it. FreeNas installer also gave me options to upgrade an older installed version on the harddisk or USB device, very nice.

Installing was very simple, booting FreeNas is very fast and configuring is very easy too if you play with it for a while. The webgui is fast and looks professional.

I created an iSCSI LUN and presented it to the ESX's. That worked pretty good. First connected it to ESX1 and then to ESX2. I created a VMFS file system via the ESX2 and then created virtual machines.

Then I ran into a problem. I noticed that the LUN was not available anymore on my ESX1 server, just on my ESX2. I tried to rescan, but I still could not add it anymore. Then I noticed that the ESX1 storage adapter could see the LUN, but I just could not add it anymore as a storage. After some google-time the problem seemed to be that FreeNas can not handle Shared Storage. And that means No VMotion! That was a bummer.

Another issue I ran into was the performance. I have the idea FreeNas is not superfast in my setup at home. The VM's are responding kind of slowish. I also used SMB/CIFS to share files from another disk and this was not fast too compared to my Fedora SAMBA setup that I had been using for  couple of years uptill then.
 

OpenFiler

I decided I had to experiment with another NAS and I wanted to try OpenFiler. Openfiler is a well known open source project and it has shared storage feature. The problem was where to find the time in my life to do this. So yesterday late in the evening I decided to start, and I finished early in the morning.

The installation is easy, not as luxureous as the FreeNas install but good. My monitor could not handle the graphic install so I had to do it via the text gui. No problem. The nice upgrade features that FreeNas has are not available in OpenFiler, and installing on a USB Memory Stick device is not supported too. The OS is bigger then the FreeNas installation. I used a 2GB partition on the harddisk for the system partition and the rest of the space I left free to create a local VMFS. OpenFiler installation uses about 600MB on the disk. After installation I connected my webbrowser using https on port 446 to the webgui, which is not as fast and as cool as FreeNas, but it works fine. Default account is openfiler with password password.

I had my USB 1TB disk that contained a partition with a VMFS filesystem and some VM's. I connected it to OpenFiler, the disk was found but I could not use it. The problem is that OpenFiler expects a disk to be partitioned with Logical Volume Manager. If not then you can not connect to existing filesystems on the disk. This was pretty uncool cause in FreeNas it is really easy to add a disk with an existing partition and use the data that is stored on it. Doesn't matter if it is ETX2, ETX3, NTFS filesystem or that you present it raw to an ESX server when you have a VMFS volume on it.

So I connected the USB 1TB VMFS disk again to a FreeNas server (that I installed on a really old PIII pc), created an iSCISI target and connected it to an ESX. I copied the VM's from it and then deleted the VMFS partition.

Then I connected the 1TB disk to OpenFiler again, used LVM to create a partition and then created an iSCSI LUN. Connected both ESX servers to it..  et voilà: shared storage!

I got OpenFiler running now for one day and I can see that it works fine. And VMotion works! Now I'm able to meet the SLA agreement that I made with myself 😉 It might be interesting to experiment with NFS too to see the performance difference with iSCSI.

There is just one other downside not related to VMware when you compare FreeNas to OpenFiler: with FreeNas I used another 220GB USB drive to share my files that are on a EXT3 filesystem via SMB/CIFS. Another 215GB USB disk I used as a backup for this disk, synchronizing it using RSYNC in FreeNas. That really works great!
As these two disks that I mentioned are not partitioned using Logical Volume Manager, OpenFiler can not find the existing EXT3 filesystems. I have to format one of the disks, use LVM to create a partition, format it to EXT3 and then copy the data. And then do the same for the second disk.
After doing this I have to find out if I can sync the two disks using RSYNC inside OpenFiler, and I'm not sure that this is possible. And then see if the performance is better then Freenas when I use SMB/CIFS to share my files. I'll let you know how this works out when I find the time to try it out.

Conclusions for now

If you want your VMware ESX servers to have shared storage so that you can VMotion then you have to use OpenFiler and not Freenas. OpenFiler works great and is not hard to setup.
FreeNas is more userfriendly and there is more eye for detail in the webgui. Future upgrade situations are handled in the installation phase. FreeNas makes it easy to add disks with existing partitions and filesystems on it when LVM is not used. OpenFiler prefers an empty disk and wants to create partitons using LVM. You can not add a disk with existing LVM's and existing partitions without doing some tricks (which I haven't tried).

Let me know if you find this article usefull, makes me happy 🙂 HaveANiceDay

More then one year later… (august 2010)

Ok, I wrote this article in March 2009. Now it's august 2010 and I have the following situation at home:

  • One ESX 4.1 server (instead of two) – new hardware that costed me about €400,- with a Xeon CPU with 4 cores, 8GB Mem and it performs very well and consumes less power
  • Six VM's running, mostly linux (no X windows) and also a W2008 (x64) and I still got resources left to experiment
  • One of the six VM's is Freenas. I attached a 500GB VMDK to it and this storage contains all of my files (documents, music, etc) And it's my bittorrent server too.
  • I used one of the old ESXi servers (desktop pc) on which I installed Freenas, and attached an external USB disk to it. So this is my backup server for my data and I use RSYNC to copy files between the two Freenas instances during the night now and then. And I use VMware's Data Recovery to backup my VM's to the Freenas Backup server.

So as you can see I started to use Freenas more then Openfiler. Why is that? Well, it's it's just a little more userfriendly and easier to set up. You can do everything in the GUI and since I have to be efficient with my time I used freenas. On my webserver I created a "proxy website" so I can connect to and configure my freenas servers from the internet when I'm not at home.
A backup of the Freenas config can be made so in case of a problem a restore is no sweat. Freenas can handle Shared Storage LUN's nowadays so that is cool too. 

Almost two years later… (januari 2011)

Recently for the first time in my life I bought a new TV, and this one is able to play files from a media server. And yes, Freenas has a builtin media server: Fuppes. I configured it and it works! If you don't have a TV with a direct media server connection you can always use a PS3, 360 Xbox and more.

The Media Server feature combined with the torrent feature in Freenas is great. First download a movie and them play it on your TV using the media server.

I only have a problem: subtitles. The .srt files are not recognized by my TV and therefor not used. For a Dutch guy a movie like The Social Network is hard work to understand everything.

By the way: both my Virtual and Physical Freenas system have not crashed yet, nor has VMware ESX 4.1 and all of my other Linux servers running on top of ESX (251 days uptime).

Well, hope you can use this info. Leave a message if you'd like. I'd appreciate it to hear your idea's.

ESXi5 and Freenas iSCSI (September 2011)

I read about the incompatibility of Freenas and ESXi5 iSCSI. On September 2nd the latest Freenas version wat released with fixes for iSCSI.

  • Upgraded Freenas 0.7.1 version to 0.7.2.7529 Sabanda. The upgrade failed, but I was warned in the readme file for this.
  • Installed Freenas from scratch and restored my old backupped configuration. This worked. So after 15 minutes I could try to connect an iSCSI target to a ESXi5 host. I just needed an ESXi5 host.
  • Installed ESXi5 on my ESXi4 platform in a guest and connected it to the iSCSI target. This seemed to work.
  • Created a guest with the VMDK on the iSCSI target and linux as a OS, this worked too.

Another job well done by Freenas.

Configure sendmail as a relayserver 150 150 Roderick Derks

Configure sendmail as a relayserver

Change the following lines in /etc/mail/sendmail.mc

define(`SMART_HOST’, `ventoux.r71.nl’)dnl

dnl DAEMON_OPTIONS(`Port=smtp,Addr=127.0.0.1, Name=MTA’)dnl
DAEMON_OPTIONS(`Port=smtp, Name=MTA’)dnl

LOCAL_DOMAIN(`alpedhuez.r71.nl’)dnl

  # m4 /etc/mail/sendmail.mc > /etc/mail/sendmail.cf

Flush deferred messages in sendmail queue

Whenever sendmail has to deliver mails to other hosts which cannot be reached at that time, the messages are kept in the queue and are marked as “Deferred: Connection timed out”. Although the other hosts could be reached again and you want to tell sendmail to flush the mail queue, the command

  # sendmail -q -v

does not really try to reconnect to these hosts and still assumes that the connection timed out. The reason is that the hoststatus is cached, per default for a period of 30 minutes. Using

  # sendmail -OTimeout.hoststatus=0m -q -v

You can re-run the mail queue and force sendmail to reconnect to the hosts. You may want to define an alias for that, say, ‘sendmail-flush-timeouts’.

Default mail queue interval setting

  #  cat /etc/sysconfig/sendmail
      DAEMON=yes
      QUEUE=1h

Test on commandline

telnet yourrelayserver.com 25

helo <hostname>
mail from: name@extrnaldomain.com
rcpt to: user@yourdomain.com
data
mail test
.

Zimbra: Problem after upgrading from 5.0.10 to 5.0.14 150 150 Roderick Derks

Zimbra: Problem after upgrading from 5.0.10 to 5.0.14

Problem

Release 5.0.14_GA_2850.F7_20090303145157 F7

I can not contact the Zimbra server anymore using a Zimbra client or the website.

# tail -f /var/log/zimbra.log
Mar 28 01:12:15 my_servername zimbramon[2461]: 2461:info: zmmtaconfig: Sleeping…Key lookup failed.
Mar 28 01:12:16 my_servername postfix/smtpd[6505]: warning: problem talking to service rewrite: Success
Mar 28 01:12:16 my_servername postfix/master[3629]: warning: process /opt/zimbra/postfix/libexec/trivial-rewrite pid 7850 exit status 1
Mar 28 01:12:16 my_servername postfix/master[3629]: warning: /opt/zimbra/postfix/libexec/trivial-rewrite: bad command startup — throttling
Mar 28 01:12:22 my_servername zimbramon[2461]: 2461:info: zmmtaconfig: Skipping Global system configuration update.
Mar 28 01:12:22 my_servername zimbramon[2461]: 2461:info: zmmtaconfig: gacf ERROR: service.FAILURE (system failure: ZimbraLdapContext) (cause: java.net.SocketException Broken pipe)
Mar 28 01:12:28 my_servername zimbramon[2461]: 2461:info: zmmtaconfig: Skipping All Reverse Proxy URLs update.
Mar 28 01:12:28 my_servername zimbramon[2461]: 2461:info: zmmtaconfig: Skipping getAllReverseProxyURLs ERROR: service.FAILURE (system failure: ZimbraLdapContext) (cause: java.net.SocketException Broken pipe)
Mar 28 01:12:32 my_servername zimbramon[2461]: 2461:info: zmmtaconfig: Skipping All Reverse Proxy Backends update.
Mar 28 01:12:32 my_servername zimbramon[2461]: 2461:info: zmmtaconfig: Skipping getAllReverseProxyBackends ERROR: service.FAILURE (system failure: ZimbraLdapContext) (cause: java.net.SocketException Broken pipe)
Mar 28 01:12:35 my_servername zimbramon[2461]: 2461:info: zmmtaconfig: Skipping All Memcached Servers update.
Mar 28 01:12:35 my_servername zimbramon[2461]: 2461:info: zmmtaconfig: Skipping getAllMemcachedServers ERROR: service.FAILURE (system failure: ZimbraLdapContext) (cause: java.net.SocketException Broken pipe)
Mar 28 01:12:38 my_servername zimbramon[2461]: 2461:info: zmmtaconfig: Skipping All MTA Authentication Target URLs update.
Mar 28 01:12:38 my_servername zimbramon[2461]: 2461:info: zmmtaconfig: Skipping getAllMtaAuthURLs ERROR: service.FAILURE (system failure: ZimbraLdapContext) (cause: java.net.SocketException Broken pipe)
Mar 28 01:12:42 my_servername zimbramon[2461]: 2461:info: zmmtaconfig: Skipping Configuration for server my_servername.r71.nl update.
Mar 28 01:12:42 my_servername zimbramon[2461]: 2461:info: zmmtaconfig: gs:my_servername.r71.nl ERROR: service.FAILURE (system failure: ZimbraLdapContext) (cause: java.net.SocketException Broken pipe)
Mar 28 01:12:42 my_servername zimbramon[2461]: 2461:info: zmmtaconfig: Sleeping…Key lookup failed.

Hostfiles seem to be OK, DNS works great… ip address did not change…
I tried to follow up advice in the ZIMBRA forum but I could not find a solution.

Problem started after the time I restarted ZIMBRA for the first time after the upgrade, so first it worked after the upgrade!

Solution

Well… this one took me a while.

I had to recreate the certificate. The guide was very helpfull.

Then I ran into the problem the MTA would not start anymore:

[zimbra@my_servername ~]$ zmcontrol start
Host ventoux.r71.nl
Starting ldap…Done.
Starting logger…Done.
Starting mailbox…Done.
Starting antispam…Done.
Starting antivirus…Done.
Starting snmp…Done.
Starting spell…Done.
Starting mta…FAILED
Starting zmmtaconfig…zmmtaconfig is already running.
postalias: warning: /etc/aliases, line 97: need name:value pair
postsuper: fatal: scan_dir_push: open directory defer: Permission denied
postfix failed to start
Starting saslauthd…done.
Starting stats…Done.

Solution to this problem:
# /opt/zimbra/libexec/zmfixperms (run as root)

I’m back in business again.

Zimbra: enable SSL access for admin site 150 150 Roderick Derks

Zimbra: enable SSL access for admin site

update: I just realize that after enabling the port 443 for the Zimbra administration, Zimbra itself becomes no more accessible through https. An automatic redirection resdirects everything to the Zimbra administration application.

It seems that the only way to combine https access to both Zimbra and Zimbra administration applications is to use Apache in front of Tomcat.


The default port of the Zimbra administration is 7071. To enable it to 443, you need to perform the following modifications:

1. Enable SSL Connector on Tomcat

In /opt/zimbra/<tomcat_dir>/conf directory, check that the SSL connector is enabled. If it is not, change server.xml.in and remove the HTML comments.

2. Allow 443 port for Zimbra administration

In /opt/zimbra/<tomcat_dir>/conf/zimbraAdmin.web.xml.in change the following lines:

<param-name>admin.allowed.ports</param-name>
<param-value>7071</param-value>

by

<param-name>admin-allowed-ports</param-name>
<param-value>443, 7071</param-value>

Also edit /opt/zimbra/<tomcat_dir>/conf/zimbra.web.xml.in and change the 2 occurrences of the following lines:

<param-name>admin.allowed.ports</param-name>
<param-value>7071</param-value>

by

<param-name>admin-allowed-ports</param-name>
<param-value>443, 7071</param-value>

Restart zimbra and you should be able to access Zimbra administration using: https://<your mail server>/zimbraAdmin

Zimbra: zmclamdctl is not running 150 150 Roderick Derks

Zimbra: zmclamdctl is not running

[zimbra@ventoux ~]$ zmcontrol status
Host ventoux.r71.nl
        antispam                Running
        antivirus               Stopped
                amavisd running pid: 23546
                zmclamdctl is not running
        ldap                    Running
        logger                  Running
        mailbox                 Running
        mta                     Running
        snmp                    Running
        spell                   Running
        stats                   Running

[zimbra@ventoux ~]$ zmclamdctl start
cp: cannot stat `/opt/zimbra/clamav/db/daily.cvd.init’: No such file or directory
cp: cannot stat `/opt/zimbra/clamav/db/main.cvd.init’: No such file or directory
ClamAV update process started at Mon Dec 22 02:09:47 2008
WARNING: Your ClamAV installation is OUTDATED!
WARNING: Local version: 0.93.3 Recommended version: 0.94.2
DON’T PANIC! Read http://www.clamav.net/support/faq
main.cld is up to date (version: 49, sigs: 437972, f-level: 35, builder: sven)
daily.cld is up to date (version: 8789, sigs: 40670, f-level: 38, builder: sven)
clamd failed to start
[zimbra@ventoux ~]$ ls /opt/zimbra/clamav/db/
[zimbra@ventoux ~]$ mv /tmp/clamdb/* /opt/zimbra/clamav/db/
[zimbra@ventoux ~]$ zmclamdctl stop
[zimbra@ventoux ~]$ zmclamdctl start
ClamAV update process started at Mon Dec 22 02:12:13 2008
WARNING: Your ClamAV installation is OUTDATED!
WARNING: Local version: 0.93.3 Recommended version: 0.94.2
DON’T PANIC! Read http://www.clamav.net/support/faq
Downloading main-48.cdiff [100%]
Downloading main-49.cdiff [100%]
main.cld updated (version: 49, sigs: 437972, f-level: 35, builder: sven)
WARNING: Your ClamAV installation is OUTDATED!
WARNING: Current functionality level = 33, recommended = 35
DON’T PANIC! Read http://www.clamav.net/support/faq
WARNING: getfile: daily-7652.cdiff not found on remote server (IP: 208.72.56.53)
WARNING: getpatch: Can’t download daily-7652.cdiff from db.us.clamav.net
WARNING: getfile: daily-7652.cdiff not found on remote server (IP: 199.184.215.2)
WARNING: getpatch: Can’t download daily-7652.cdiff from db.us.clamav.net
WARNING: getfile: daily-7652.cdiff not found on remote server (IP: 155.98.64.86)
WARNING: getpatch: Can’t download daily-7652.cdiff from db.us.clamav.net
WARNING: Incremental update failed, trying to download daily.cvd
Downloading daily.cvd [100%]
daily.cvd updated (version: 8789, sigs: 40670, f-level: 38, builder: sven)
WARNING: Your ClamAV installation is OUTDATED!
WARNING: Current functionality level = 33, recommended = 38
DON’T PANIC! Read http://www.clamav.net/support/faq
Database updated (478642 signatures) from db.us.clamav.net (IP: 64.246.134.219)
WARNING: Clamd was NOT notified: Can’t connect to clamd on 127.0.0.1:3310
connect(): Connection refused


[zimbra@ventoux ~]$ zmcontrol status

Host ventoux.r71.nl
        antispam                Running
        antivirus               Running
        ldap                    Running
        logger                  Running
        mailbox                 Running
        mta                     Running
        snmp                    Running
        spell                   Running
        stats                   Running

Configure ESXi for HA: set userworld swap 150 150 Roderick Derks

Configure ESXi for HA: set userworld swap

When using ESXi (Embedded) in a VirtualCenter cluster with HA enabled, you’ll run into a problem with userworld swap. Every ESXi host needs this swap enabled. VMware KB 1004177 explains the steps needed to enable and configure the swap location.

Error messages in VIC when enabling HA for the cluster look like this:

  • Unable contact primary ha agent resources 
  • HA agent on <esxhostname> in cluster <clustername> in <datacenter> has an error Incompatible HA Network

This location can be a folder on an existing shared VMFS Datastore (already populated with VM’s) or a local storage you don’t use. It’s also possible to create a folder (like /vmfs/volumes/4943e754-e9a0586f-5b5b-00123fce94a3/swap/esx01) to host multiple ESXi swap files on one VMFS Datastore. This will eliminate the need for a separate LUN for every ESXi host cause that would be rather silly.

getting console access on a vmware esxi server
Enable SSH on your ESXi Server 500 277 Roderick Derks

Enable SSH on your ESXi Server

As you probably know ESX 3i is the embedded version of ESX, mainly run from usb flash disks build-in servers from HP, Dell, IBM and FSC, but you can also install this on your own servers. I really love this version as it is so easy and simple and adds extra (and less) functionality to ESX. The main thing about 3i is that the Red Hat service console has been removed and replaced by a small busybox linux version. To keep this service console tiny, 3i comes with build-in hardware monitoring, something a normal ESX server does not have. When connecting to a 3i server with your VC client you can see fan speeds and temperatures in your system and you can of course put alarms on them, in case something breaks.

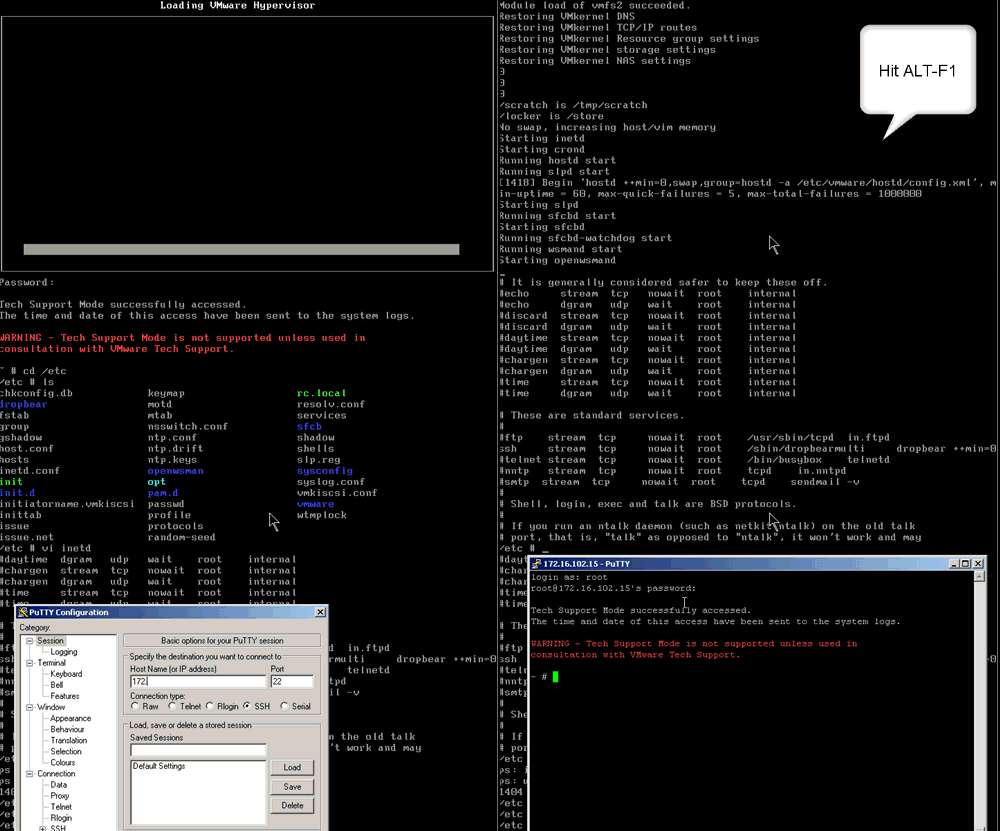
By default the 3i server gives us no access to this small service console, but there are some down sides to this, as certain things can only be done from the service console. And until VMware builds those missing functionalities into the VC interface you still need to get yourself console access. In the beta versions of 3i there was an option in the advanced settings, but this has been removed in the final releases. VMware has published a knowledge base article that describes how to get console access (this is not officially supported by VMware). In short you just hit Alt-F1 and then type in ‘unsupported’ followed by the root password. The article also explain how to disable this Tech Support Mode, in case you want to.

getting console access on a vmware esxi server

(the password that is asked is the password for root)

Of course you do not want to be in the server room all the time and your server might not have some kind of remote access facility, so the first thing you probably want to do is enable SSH access to your server.
# edit /etc/inetd.conf (using vi)
# remove the # (remark) sign in front of the SSH line
# kill and restart the inetd process (or just reboot your server)

So why do you need console access?
There are multiple reasons why you want to have console access. One of the most common reasons is that you might want to change HBA driver options. To get better performance out of your Qlogic or Emulex HBA most people increase their queue depth (see for instance VMware 100.00 io blog post). To find out what options you can set on your drivers you can use the command vmkload_mod:
# display your loaded drivers: vmkload_mod –list
# display parameters for your driver: vmkload_mod -s /mod/your_driver

Another reason why you definitely still need console access (unfortunately) is if you want to use thin provisioned virtual disks, a new feature in ESX, but for some reason not exposed in the VC interface yet (i think because it is still experimental supported). Any virtual disks created via the normal interface are pre-allocated disks, so a 100GB virtual disk will use 100GB on your VMFS. With thin provisioned disks the actual virtual disk file will start very small and only grow when you will actually need the disk space. Note: this only works for Virtual Disks on iSCSI and FC SAN, not NFS!

With the vmkfstools command you can create new virtual disks as ‘thin’ disks. After you created the disks, you can then use the normal VC interface to add that disk to your VM.

Creating a 100GB thin disk:
vmkfstools -c 100G -d thin /vmfs/volumes/san_vmfs/my_vm/thin_disk.vmdk

If you already have a pre-allocated disk, you can convert it to a thin disk as well. Well it is not really converting, but creating a new copy as thin disk. After you have done that, you will need to remove the old disk from the VM and add the new converted copy.

‘convert’ copy a existing virtual disk to thin format:
vmkfstools -i /vmfs/volumes/san_vmfs/my_vm/large_disk.vmdk -d thin /vmfs/volumes/san_vmfs/my_vm/new_thin_disk.vmdk

Well I am sure there are more reasons why you still want to ‘play’ on the service console. As I grew up with a commodore 64 I always want a command prompt (but I’m glad we lost the tape drive 😉 )

Thanks to www.run-virtual.com for this info.

Move a VM from VMware Server to ESX or ESXi 150 150 Roderick Derks

Move a VM from VMware Server to ESX or ESXi

Objective: Move a VM from VMware Server to ESX or ESXi

Prequisits: root access via ssh to the ESXi or ESX server (read more about how to get ssh access to ESXi)

  1. Make a folder with the name of your host (I used “ventoux” in the example) on your ESX VMFS partition to hold the migrated VM. Copy over the .vmx file, nvram, and everything else but the .vmdk files into this folder.
    # scp  /DATA/vmware/vmmachines/FC7/ventoux/*.vmx* root@10.0.2.31:/vmfs/volumes/VMFS_ESX01_01/telegraph/
    # scp  /DATA/vmware/vmmachines/FC7/ventoux/*.vmsd root@10.0.2.31:/vmfs/volumes/VMFS_ESX01_01/telegraph/
  2. Make a second folder (“ventoux_vmdk”) on your VMFS partition and copy over the .vmdk files.
    # scp  /DATA/vmware/vmmachines/FC7/ventoux/*.vmdk root@10.0.2.31:/vmfs/volumes/VMFS_ESX01_01/ventoux_vmdk
  3. import the vmdks
    # for i in /path_to/folder_containing_vmdks/*.vmdk; do vmkfstools -i /path_to/folder2/$i /path_to/folder_containing_vmx/$i; done
    My command looked like this:
    # for i in /vmfs/volumes/VMFS_ESX01_01/ventoux_vmdk/*.vmdk; do vmkfstools -i /path_to/folder2/$i /vmfs/volumes/VMFS_ESX01_01/ventoux/$i; done
  4. Log into VIC, browse your datastore, go to the folder you created. Right-click on the .vmx file and select add to inventory. That should do it!

Some last notes:

  • Don’t forget to upgrade the virtual hardware from the pull-down menu, if necessary.
  • Also, you may need to re-install ESX’s VMware tools once it’s running. The virtual LAN adapter sometimes doesn’t convert properly. Just delete it out of the VM and re-add it using the VI Client
  • I got this error message when I wanted to edit hthe vm’s properties:
    Unable to find memory information for guest OS. Using legacy defaults.

    Resolution
    You need to ensure the virtual machine has an operating system selected in its settings.
     
    To ensure an operating system is selected:
       1. Right-click on the virtual machine and click Edit Settings.
          The Virtual Machine Properties window opens.
       2. Click the Options tab in the Virtual Machine Properties window.
       3. Select the appropriate guest operating system.
       4. Click OK
           Now virtual machine can be edited without receiving that error message.


Boot VMware ESXi 4.0 4.1 from a USB Flash Drive 150 150 Roderick Derks

Boot VMware ESXi 4.0 4.1 from a USB Flash Drive

Tools required to do the job:

  • At least 1G USB flash drive
  • Virtual CD mounting tool, i.e. MagicDisk
  • WinImage to build the image to USB storage.

Steps to make the bootable ESX Server 3i USB flash drive:

  1. Download ESXi Installable ISO
  2. For 4.0 extract INSTALL.TGZ from the root directory of the ISO image using WINIMAGE the Virtual CD mounting tool
    For 4.1 extract imagedd.bz2 from the root off the ISO to your harddisk using WINIMAGE. (WinRAR gave me problems later on the process)
  3. For 4.0 extract /usr/lib/vmware/installer/VMware-VMvisor-big-3.5.0-xxxxx.i386.dd.bz2 from INSTALL.TGZ
  4. For 4.0 extract VMware-VMvisor-big-3.5.0-xxxxx.i386.dd from VMware-VMvisor-big-3.5.0-xxxxx.i386.dd.bz2
    For 4.1 extract imagedd form imagedd.bz2
  5. Attach the USB flash drive and make sure you no longer need the data on it
  6. Use WinImage to transfer VMware-VMvisor-big-3.5.0-xxxxx.i386.dd to the USB flash drive
    1. Disk->Restore Virtual Hard Disk image on physical drive…
    2. Select the USB flash drive (Warning: If you select the wrong disk you will lose data!)
    3. Select the image file VMware-VMvisor-big-3.5.0-xxxxx.i386.dd or imagedd
    4. Confirm the warning message
    5. Wait for the transfer to complete
  7. Unplug the USB flash drive (Warning: If you forget to unplug the flash drive from the PC you might lose the data on your hard drives the next time you boot!)
  8. Attach the USB flash drive to the machine you want to boot (Warning: If ESX Server 3i recognizes local drives, you might lose the data on it, so make sure you don´t need it anymore or unplug all hard drives!)
  9. Turn the machine on and make sure the USB flash drive is selected as boot device
  10. Enjoy.

Notes:

The physical machine you want to boot from must have the option to make the USB flash drive as the boot device.

You can also watch a tutorial video.

    Your Name (required)

    Your Email (required)

    Subject

    Your Message

      Your Name (required)

      Your Email (required)

      Subject

      Your Message