Posts By :

Roderick Derks

VMware ESX and Hyper-Threading 150 150 Roderick Derks

VMware ESX and Hyper-Threading

This article is based on my own performance measurements using the passmark tool.

Hyper-Threading gives you a 15% to 20% performance gain on "common" VM's. Some CPU intensive applications which are not multi-threaded build can suffer badly from Hyper-Threading functionality. I think this is because a physical CPU core is split and delivers 50% of the perfomance of the physical core on a vCPU (1 CPU with 4 cores and Hyper-Threading enabled gives you 8 vCPU's).

Because the application is not multi-threaded it will not make full use of multi-threading. Disabling Hyper-Threading on the VM gives a slight improvement. Disabling Hyper-Threading in the BIOS of the ESX host makes the performance go up to around 170%.

Trainen en vakantie op Gran Canaria 200 150 Roderick Derks

Trainen en vakantie op Gran Canaria

Wat een goed idee, trainen op Gran Canaria zo richting eind maart. En tot laat in de avond eten op de boulevards aan de kust in de heerlijke warmte. Precies goed.

Ondanks de last van m'n rug toch heerlijk gefietst. Even in het kort de statistieken:

  • 5 ritten waarvan 4 op de racefiets en één korte rit op de MTB
  • 368 km
  • 16 uur
  • 7.000 hoogtemeters
  • 16.400 caloriën
  • Mooiste rit vind je hier

Hieronder wat foto's, meer foto's vind je hier.

Zimbra: Certificate Expiration and Renewal 150 150 Roderick Derks

Zimbra: Certificate Expiration and Renewal

This article is mainly to prepare myself for possible upcoming certification renewals.

Zimbra ZCS 7.0.x requires a valid self-signed or commercial SSL certificate for communication between some components. The self-signed certificates that are automatically created by the ZCS install have a default expiration of 365 days.
If you have an ZCS installation that is over one year old and are using self-signed certificates, your certificates will need to be updated either prior to the upgrade or immediately following the upgrade.
After you upgrade, the following commands run as the zimbra user will regenerate the self-signed SSL certificates:

# sudo zmcertmgr createca -new # sudo zmcertmgr deployca # sudo zmcertmgr deploycrt self 

If you get an error like:

# zmcertmgr createca -new [sudo] password for zimbra: 

Then make sure you type the commands using the full path (because that is the way sudo probably is configured):

# sudo /opt/zimbra/bin/zmcertmgr createca -new # sudo /opt/zimbra/bin/zmcertmgr deployca # sudo /opt/zimbra/bin/zmcertmgr deploycrt self 
Install Centreon Syslog server 491 250 Roderick Derks

Install Centreon Syslog server

Starting point: Centreon 2.1.12 Centos 5.5

1. U will need ssh2 library to work in php and apache

# yum install php-pecl-ssh2.x86_64
# service httpd restart

Centos 6.2 get the package from http://pkgs.org/centos-6-rhel-6/remi-x86_64/php-pecl-ssh2-0.11.2-1.el6.remi.x86_64.rpm.html:

wget http://dl.fedoraproject.org/pub/epel/6/x86_64/epel-release-6-7.noarch.rpm
wget http://rpms.famillecollet.com/enterprise/remi-release-6.rpm
rpm -Uvh remi-release-6*.rpm epel-release-6*.rpm

or

wget http://www.libssh2.org/download/libssh2-1.4.2.tar.gz
tar xvzf libssh2-1.4.2.tar.gz
cd libssh2-1.4.2
./configure
make
make install

Check if ssh2 library is correctly installed:

# php -i |grep ssh
/etc/php.d/ssh2.ini,
Registered PHP Streams => php, file, http, ftp, compress.bzip2, compress.zlib, https, ftps, ssh2.shell, ssh2.exec, ssh2.tunnel, ssh2.scp, ssh2.sftp
ssh2
libssh2 version => 1.2.6
banner => SSH-2.0-libssh2_1.2.6

2. Download and install the centreon-syslog-server
Log into http://forge.centreon.com and download the latest release.
# tar -zxvf centreon-syslog-server-1.3.3.tar.gz
# cd centreon-syslog-server-1.3.3.tar.gz
# ./install.sh -i
NOTE:
go thru the interactive setup, u will need the mysql root pass.
Make note of the new syslog user created

3. Download and install centreon-syslog-frontend
Log into http://forge.centreon.com and download the latest release.
# cd centreon-syslog-frontend-1.2.1.tar.gz
# ./install.sh -i

NOTE:
the folder of “instCentWeb.conf” should be /etc/centreon

4. Go on Centreon web interface
Go on menu ‘Administration > Modules > Setup’.
Syslog module must be present on modules list but not installed.
Click on right icon to start installation

5. Go on menu ‘Administration > Modules > Syslog configuration’.
Fill the fields

6. Go on menu ‘Monitoring > Syslog > Monitoring’

7. Install rsyslog

# yum install rsyslog.x86_64  rsyslog-mysql
# vi /etc/rsyslog.conf

Insert at the beginig of the file these parameter to enable UDP and TCP input

$ModLoad MySQL
$AllowedSender UDP, 127.0.0.1, 192.168.1.0/24
$AllowedSender TCP, 127.0.0.1, 192.168.1.0/24

Change network 192.168.1.0/24 to your network.
And then paste these lines (there are two lines) at the end of the file:

# Configuration changes for Windows/Snare/Centreon-E2S logs
$EscapeControlCharactersOnReceive off

$template sysMysql,"INSERT INTO logs (host,facility, priority,level,tag,datetime,program,msg) VALUES ('%HOSTNAME%','%syslogfacility%','%syslogpriority%','%syslogseverity%','%syslogtag%','%timereported:::date-mysql%','%programname%', '%msg:::space-cc%')", SQL

*.* >IP_SERVEUR_DB,DB_NAME,BD_USER,DB_PASSWORD;sysMysql

*.=notice;mail.*;\
       *.=crit;*.=err;\
       *.=warning >
IP_SERVEUR_DB,DB_NAME,BD_USER,DB_PASSWORD;sysMysql

Change IP_SERVEUR_DB, DB_NAME, BD_USER et DB_PASSWORD to your information.

Edit the file "rsyslog" to receive syslog events, also listen on UDP TCP on port 514 :
# vi /etc/sysconfig/rsyslog

Replace the line:
SYSLOGD_OPTIONS="-m 0"

By this line:
SYSLOGD_OPTIONS="-r514 -t514 -m 0"

Restart the syslog daemon :
# /etc/init.d/rsyslog start

Make sure the centreon server rsyslog is listening in port UDP 514

7. Windows logs to Syslog server:

Install DotNET framework 2 or higher
Install Centreon E2S and edit the xml file (add ip address syslog server)

On windows machine install the Centreon E2S, wich will forward
the events you filter to the syslog centreon server.
download from here:

http://forge.centreon.com/attachments/download/545/Centreon_E2S.1.1.zip

Change in the config.ini file the IP address of the server

9. Linux Fedora/RedHat/Centos logs to Syslog server

# vi /etc/rsyslog.conf

and add:

# RRD to syslog server
*.emerg;cron;*.info;authpriv.*                          @192.168.1.0:514

then restart rsyslog

# /etc/init.d/rsyslog restart

10. ESXi

Go to the VI clinet and open the ESXi server config pages. Go to "Advanced Settings" and find the Syslog entry. Add the ip address of the syslog server. But wait.. ESXi messages messed up my Centreon Syslog server, so I created a thread on the centreon forum to ask for advice.

Find available WMI classes on Windows server 150 150 Roderick Derks

Find available WMI classes on Windows server

To do that, on the server :

  • run "wbemtest"
  • click on "connection" and type "root\cimv2"
  • click on "enumerate classes" and type "Win32_PerfRawData". Press "ok"


You should see a list of all Win32_PerfRawData WMI classes on the server.

If you wan to find MSSQL WMI information make sure that you see a bunch of "Win32_PerfRawData_MSSQL{Instance}_MSSQL{Instance}" lines. If you don't, you have a problem with the MSSQL Installation.

  • Double click on Win32_PerfRawData_MSSQL{Instance}_MSSQL{Instance}GeneralStatistics
  • Select the Propertie "_CLASS   _CIM_STRING    Win32_PerfRawData…." and click on "Instances".
  • On the new window, you should at least 1 line. If you don't, it means that WMI cannot find any data for your MSSQL Instance. Normaly, wmiadap /f fixes it…
  • If you see an instance line, double click on it and it will load the performance counters
Nagios: check vCenter MSSQL databases 491 250 Roderick Derks

Nagios: check vCenter MSSQL databases

There are more ways to check a MSSQL database from a Linux machine. This is my method for a Centos 5.5 server with Nagios 3.2.3.

# wget http://labs.consol.de/wp-content/uploads/2011/01/check_mssql_health-1.5.8.2.tar.gz
or a newer version
# wget http://labs.consol.de/download/shinken-nagios-plugins/check_mssql_health-1.5.9.3.tar.gz
# tar xvzf check_mssql_health-1.5.8.2.tar.gz
# cd check_mssql_health-1.5.8.2
# ./configure
# make
# make install
# yum install perl-DBD-Sybase.x86_64

# vi /etc/freetds.conf
[vcenter]
        host = vcenter.r71.nl
        port = 49209
        tds version = 8.0

The vCenter MSSQL installation listens to port 49209, not the standard 1433 port.

Now add a Windows user without any special rights, I named it "Nagios".

# ./check_mssql_health --server rainier --username=vcenter\\nagios --password=******** --mode=connection-time
OK - 0.03 seconds to connect as VCENTER\nagios | connection_time=0.03;1;5

MySQL: allow remote conections 491 250 Roderick Derks

MySQL: allow remote conections

Very simple guide to allow remote connectios to your MySQL database. I use this for monitoring MySQL databases from 360°Viewpoint (a great preconfigured Nagios and Centreon Virtual App).

# vi /etc/my.cnf

  bind-address = ip_address_of_local_server
  # skip-networking

Allow access to all databases for one user:

mysql> GRANT ALL PRIVILEGES ON *.* TO user@ip_address_remote_server IDENTIFIED BY "password";

Allow access to one databases for one user:

mysql> update db set Host='ip_address_remote_server' where Db='database_name';
mysql> update user set Host='
ip_address_remote_server' where user='username';

Continue configuration of the Nagios check_mysql_health plugin:

  • download the plugin and compile it
  • run the plugin using the following the commandline:
    ./check_mysql_health –hostname server_name –username user –password password –mode connection-time
    OK – 0.03 seconds to connect as user | connection_time=0.0333s;1;5

Zimbra (uses port 7306 for MySQL, not the standard port 3306):

as root:
vi /opt/zimbra/conf/my.cnf
 #bind-address = localhost

/opt/zimbra/mysql/bin/mysql -u root -p -S /opt/zimbra/db/mysql.sock
mysql> GRANT ALL PRIVILEGES ON *.* TO user@ip_address
_remote_server IDENTIFIED BY "password";
mysql> GRANT ALL ON *.* TO 'zimbra'@'ip_address_of_zimbraserver' WITH GRANT OPTION;

To get the password for user root execute the following commands:
su - zimbra
zmlocalconfig -s | grep mysql | grep password

su - zimbra
zmcontrol restart

Zimbra: upgrade 6.0.10 to 7.0.0 291 126 Roderick Derks

Zimbra: upgrade 6.0.10 to 7.0.0

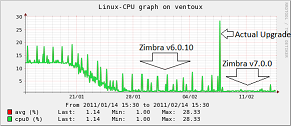
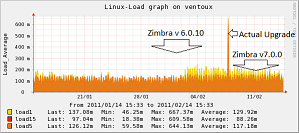
Finally something has been done about the performance issues in the Zimbra collaberation suite. Now you don't have to have to disable scripts and adjust parameters to get a normal CPU performance. Take a look at the performance graphs of my zimbra virtual machine. The upgrade took place on the 7th of Februari 2011 (the releasedate) and no additional configuration changes concerning the performance have been made.

Graphs supplied by 360° Viewpoint (Nagios and Centreon).

MySQL table upgrades are not automatically run during the upgrade to 7.0. After the upgrade I executed the script /opt/zimbra/libexec/scripts/migrate20100913-Mysql51. It says so in the release notes, only I forgot to read it. So I did this becasue I received an automated e-mail from Zimbra after a scheduled database integrity check which failed:

Database errors found.
/opt/zimbra/mysql/bin/mysqlcheck –defaults-file=/opt/zimbra/conf/my.cnf -S /opt/zimbra/db/mysql.sock -A -C -s -u root –password=********************
mboxgroup1.appointment
 error    : Table upgrade required. Please do "REPAIR TABLE `appointment`" or dump/reload to fix it!
 mboxgroup1.data_source_item
 error    : Table upgrade required. Please do "REPAIR TABLE `data_source_item`" or dump/reload to fix it!
 mboxgroup1.imap_folder
….. and so on.

After running this script there are still some errors that are not solved yet:

Database errors found.
mysql.general_log
 Error    : You can't use locks with log tables.
 mysql.slow_log
 Error    : You can't use locks with log tables.

The new features come in many. Three examples:

  • social networks like twitter and facebook are completely integrated
  • the agenda offers more features like checking the availability of others when planning an appointment
  • users can restore items that are deleted from the trashcan themselves

Everything runs smoothly in my FC11 64bit VM. Conclusion: do the upgrade!

Update 22 March 2011:
Memory usage is higher than with 6.x and as a result to prevent swapping I restart my zimbra server every day via the crontab. This saves me the costs of expanding the 2GB memory I committed to the Virtual Server.

Update 11 March 2011:
I upgraded to 7.0.1 and the process went smoothly.

Centreon: services doubled 150 150 Roderick Derks

Centreon: services doubled

Number of services in Centreon doubled, just the number not the actual amount of services. Nagios has no strange behaviour.

Problem is in the NDO database. Solution:

  • Stop Nagios
  • Empty all tables of NDO (via phpmyadmin)
  • Start Nagios via the Centreon frontend
RESXTOP: how to reduce output 150 150 Roderick Derks

RESXTOP: how to reduce output

To reduce the size of your esxtop output by selectively include only the statistics you are interested in. This way you save a lot of time collecting the data and this makes the command usefull for monitoring systems like Nagios. Here’s how you can narrow down the collected stats for easier analysis and smaller output:

  1. Enter ESXTOP in interactive mode on the Service Console by simply typing esxtop at the # prompt
  2. Switch to a component you are NOT interested in capturing statistics on by pressing the corresponding menu option (c: ESX cpu, m: ESX memory, d: ESX disk adapter, u: ESX disk device, v: ESX disk VM).
  3. Press f when viewing the component you do not want to capture.  A list of fields will be displayed.  You can toggle the fields on and off by pressing the letter corresponding to each field.  An * indicates that the field is on.  You want to turn off all of the fields you don’t want to collect.
  4. Repeat steps 2 & 3 for the remaining components, leaving only what you want to capture.
  5. Switch to the component you want to capture in batch mode and repeat step #3, except you will now enable what you want to capture.
  6. Press W (capital W – case sensitive) to write out the ESXTOP configuration file.  You can accept the default or create new configuration files.  You may want to create a CPU-only config file, memory-only, and so forth.
  7. Press CTRL+C to stop ESXTOP.
  8. Now, invoke ESXTOP in batch mode, calling your updated or new configuration file you created in step #6 using the -c switch.  Here’s an example:# esxtop -b -d 30 -n 480 -c .esxtopcpustats > /tmp/esxtop_cpu_stats.csv where .esxtopcpustats is an ESXTOP config file with only CPU stats.  -d sets your capture interval to 30 seconds, and -n sets the number of samples to 480 (or 4 hours with a delay of 30 seconds).

Once your capture is complete you can replay the sampling in ESXTOP using replay mode (-R), or you can copy the .csv to a Windows system and use PERFMON or Excel to analyze the stats.  If using PERFMON or Excel you will notice that the system summary information displayed at the top of an interactive ESXTOP session is included in the output (console memory, console cpu, etc.).  As far as I know, there is no way to disable this, nor would you want to as it includes the time stamp necessary to interpret your data.

It is possible to use the vSphere CLI or the vSphere Management Assistant (vMA) to run RESXTOP, a version of ESXTOP designed for remote administration of ESXi or ESX.  You may note, however, RESXTOP from the vSphere CLI only works from a Linux client.  Using either of these tools will help you to automate ESXTOP statistics collection from multiple hosts using customized configuration files and put in Nagios.

Thnx to vmtoday.com.

    Your Name (required)

    Your Email (required)

    Subject

    Your Message

      Your Name (required)

      Your Email (required)

      Subject

      Your Message