Posts By :

Roderick Derks

Uitzicht richting Cannes
Lente in Cannes 200 150 Roderick Derks

Lente in Cannes

Methode hoe je van de herfst in de lente geraakt: je vertrekt op bijvoorbeeld 23 februari 2009 om op 7:50u vanuit huis in de kou en de regen met je winterjas aan en je das om. Je pakt de trein naar Rotterdam en daarna het vliegtuig naar Nice, en om 12:45u sta je in een heerlijk lentezonnetje. En om 16u wordt het dan echt een feestje als je met je racefiets over de boulevard van Cannes rijdt. Nee, zweeft. Het mag duidelijk zijn, het is hier heerlijk. Zon, strakblauwe hemel, de temperatuur ligt boven de 10 graden en er staat een matig windje vanuit zee. Winterjas? Hahahahaha enz..

read more

Specialized Epic 2008
Specialized Epic testrit 200 150 Roderick Derks

Specialized Epic testrit

Jawel, ik heb vanochtend het genoegen gehad een specialized Epic MTB 2008 eens flink te mogen testen. Vijf maanden oud en ziet eruit als nieuw. Met vier andere mannen reed ik vanochtend op de MTB-paden in Loonse en Drunense Duinen. Een heerlijk zonnetje, strakblauwe hemel, iets onder de nul graden en nauwelijks wind. Wat kan het leven toch mooi zijn. We zouden elkaar ontmoeten ergens in Tilburg-Noord, en drie van de vier mannen kende ik nog niet. Bleek dat onderweg daar naar toe de drie mij al hadden zien rijden en mij herkende aan de fiets. Die valt dus wel op. Gezamelijk reden we naar het ontmoetingspunt en vandaar naar de Duinen.

read more

Voorpret: 10 dagen Côte d’Azur 150 150 Roderick Derks

Voorpret: 10 dagen Côte d’Azur

Leuk, voorpret bij het plannen van een aantal fietsroutes aan de Côte d’Azur, in en rondom Nice, Monaco en Cannes.

Nu ik daar toch naar toe ga voor m’n werk eind deze maand kan ik meteen het leuke combineren met het fantastische: fietsen! Nabij Nice ligt de vrij onbekende klim van de Col de la Madone De Gorbio. Schijnt behoorlijk pittig te zijn, en met geweldige uitzichten over de kuststreek. Lance Armstrong trainde hier om zichzelf te testen vlak voordat hij zijn eerste tour won, een legendarische berg dus. En op de weg daar naar toe vanuit Nice rij je over de Col d’Eze en de Col de la Turbie met uitzichten over Monaco

read more

Routes Ardechoise 2009
Routes Ardechoise 2009 200 270 Roderick Derks

Routes Ardechoise 2009

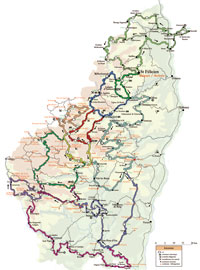
Het is 2009, de dagen worden langer en de belofte van een mooie lente geeft hoop in deze koude dagen. Al enige tijd heb ik de nieuwe routes van de Ardechoise, mijn favoriete fietsevenement, in mijn bezit en dagdroom ik over lange fietsdagen in de Ardeche. De brandende zon aan de hemel, plakkend asfalt, de mooie natuur en een gemoedelijk sfeertje. Bij deze de kaart om zo mee te kunnen delen in de voorpret.


Routes Ardechoise 2009


Zimbra: enable SSL access for admin site 150 150 Roderick Derks

Zimbra: enable SSL access for admin site

update: I just realize that after enabling the port 443 for the Zimbra administration, Zimbra itself becomes no more accessible through https. An automatic redirection resdirects everything to the Zimbra administration application.

It seems that the only way to combine https access to both Zimbra and Zimbra administration applications is to use Apache in front of Tomcat.


The default port of the Zimbra administration is 7071. To enable it to 443, you need to perform the following modifications:

1. Enable SSL Connector on Tomcat

In /opt/zimbra/<tomcat_dir>/conf directory, check that the SSL connector is enabled. If it is not, change server.xml.in and remove the HTML comments.

2. Allow 443 port for Zimbra administration

In /opt/zimbra/<tomcat_dir>/conf/zimbraAdmin.web.xml.in change the following lines:

<param-name>admin.allowed.ports</param-name>
<param-value>7071</param-value>

by

<param-name>admin-allowed-ports</param-name>
<param-value>443, 7071</param-value>

Also edit /opt/zimbra/<tomcat_dir>/conf/zimbra.web.xml.in and change the 2 occurrences of the following lines:

<param-name>admin.allowed.ports</param-name>
<param-value>7071</param-value>

by

<param-name>admin-allowed-ports</param-name>
<param-value>443, 7071</param-value>

Restart zimbra and you should be able to access Zimbra administration using: https://<your mail server>/zimbraAdmin

Zimbra: zmclamdctl is not running 150 150 Roderick Derks

Zimbra: zmclamdctl is not running

[zimbra@ventoux ~]$ zmcontrol status
Host ventoux.r71.nl
        antispam                Running
        antivirus               Stopped
                amavisd running pid: 23546
                zmclamdctl is not running
        ldap                    Running
        logger                  Running
        mailbox                 Running
        mta                     Running
        snmp                    Running
        spell                   Running
        stats                   Running

[zimbra@ventoux ~]$ zmclamdctl start
cp: cannot stat `/opt/zimbra/clamav/db/daily.cvd.init’: No such file or directory
cp: cannot stat `/opt/zimbra/clamav/db/main.cvd.init’: No such file or directory
ClamAV update process started at Mon Dec 22 02:09:47 2008
WARNING: Your ClamAV installation is OUTDATED!
WARNING: Local version: 0.93.3 Recommended version: 0.94.2
DON’T PANIC! Read http://www.clamav.net/support/faq
main.cld is up to date (version: 49, sigs: 437972, f-level: 35, builder: sven)
daily.cld is up to date (version: 8789, sigs: 40670, f-level: 38, builder: sven)
clamd failed to start
[zimbra@ventoux ~]$ ls /opt/zimbra/clamav/db/
[zimbra@ventoux ~]$ mv /tmp/clamdb/* /opt/zimbra/clamav/db/
[zimbra@ventoux ~]$ zmclamdctl stop
[zimbra@ventoux ~]$ zmclamdctl start
ClamAV update process started at Mon Dec 22 02:12:13 2008
WARNING: Your ClamAV installation is OUTDATED!
WARNING: Local version: 0.93.3 Recommended version: 0.94.2
DON’T PANIC! Read http://www.clamav.net/support/faq
Downloading main-48.cdiff [100%]
Downloading main-49.cdiff [100%]
main.cld updated (version: 49, sigs: 437972, f-level: 35, builder: sven)
WARNING: Your ClamAV installation is OUTDATED!
WARNING: Current functionality level = 33, recommended = 35
DON’T PANIC! Read http://www.clamav.net/support/faq
WARNING: getfile: daily-7652.cdiff not found on remote server (IP: 208.72.56.53)
WARNING: getpatch: Can’t download daily-7652.cdiff from db.us.clamav.net
WARNING: getfile: daily-7652.cdiff not found on remote server (IP: 199.184.215.2)
WARNING: getpatch: Can’t download daily-7652.cdiff from db.us.clamav.net
WARNING: getfile: daily-7652.cdiff not found on remote server (IP: 155.98.64.86)
WARNING: getpatch: Can’t download daily-7652.cdiff from db.us.clamav.net
WARNING: Incremental update failed, trying to download daily.cvd
Downloading daily.cvd [100%]
daily.cvd updated (version: 8789, sigs: 40670, f-level: 38, builder: sven)
WARNING: Your ClamAV installation is OUTDATED!
WARNING: Current functionality level = 33, recommended = 38
DON’T PANIC! Read http://www.clamav.net/support/faq
Database updated (478642 signatures) from db.us.clamav.net (IP: 64.246.134.219)
WARNING: Clamd was NOT notified: Can’t connect to clamd on 127.0.0.1:3310
connect(): Connection refused


[zimbra@ventoux ~]$ zmcontrol status

Host ventoux.r71.nl
        antispam                Running
        antivirus               Running
        ldap                    Running
        logger                  Running
        mailbox                 Running
        mta                     Running
        snmp                    Running
        spell                   Running
        stats                   Running

Configure ESXi for HA: set userworld swap 150 150 Roderick Derks

Configure ESXi for HA: set userworld swap

When using ESXi (Embedded) in a VirtualCenter cluster with HA enabled, you’ll run into a problem with userworld swap. Every ESXi host needs this swap enabled. VMware KB 1004177 explains the steps needed to enable and configure the swap location.

Error messages in VIC when enabling HA for the cluster look like this:

  • Unable contact primary ha agent resources 
  • HA agent on <esxhostname> in cluster <clustername> in <datacenter> has an error Incompatible HA Network

This location can be a folder on an existing shared VMFS Datastore (already populated with VM’s) or a local storage you don’t use. It’s also possible to create a folder (like /vmfs/volumes/4943e754-e9a0586f-5b5b-00123fce94a3/swap/esx01) to host multiple ESXi swap files on one VMFS Datastore. This will eliminate the need for a separate LUN for every ESXi host cause that would be rather silly.

getting console access on a vmware esxi server
Enable SSH on your ESXi Server 500 277 Roderick Derks

Enable SSH on your ESXi Server

As you probably know ESX 3i is the embedded version of ESX, mainly run from usb flash disks build-in servers from HP, Dell, IBM and FSC, but you can also install this on your own servers. I really love this version as it is so easy and simple and adds extra (and less) functionality to ESX. The main thing about 3i is that the Red Hat service console has been removed and replaced by a small busybox linux version. To keep this service console tiny, 3i comes with build-in hardware monitoring, something a normal ESX server does not have. When connecting to a 3i server with your VC client you can see fan speeds and temperatures in your system and you can of course put alarms on them, in case something breaks.

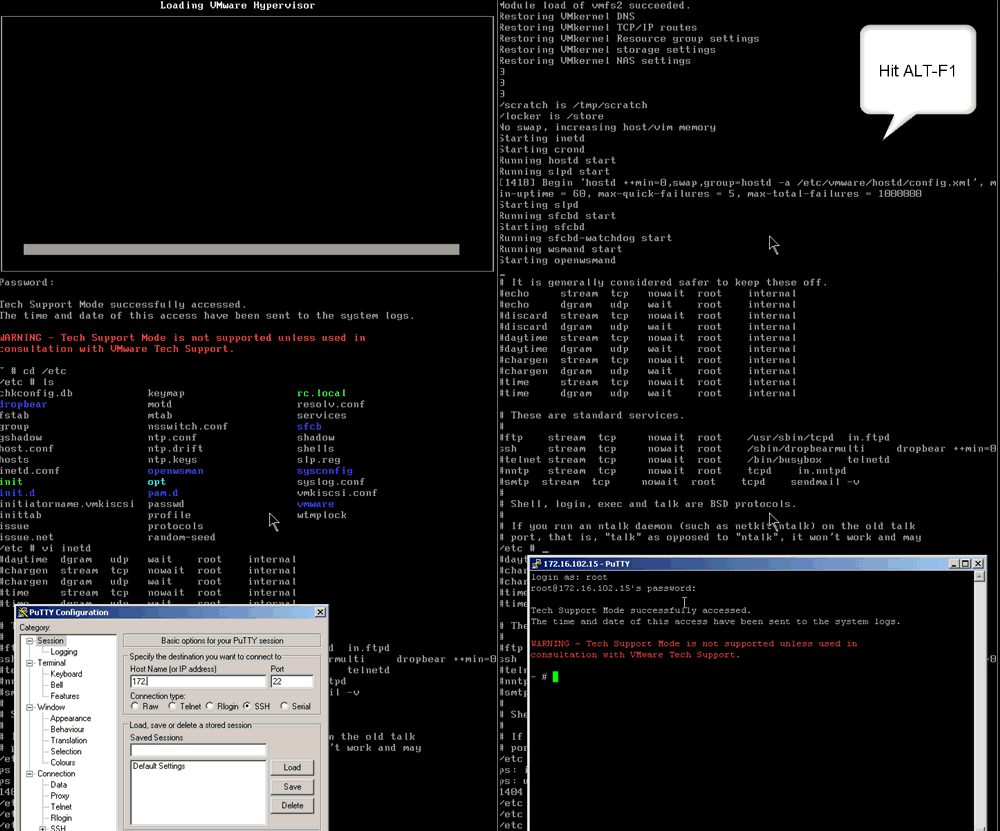
By default the 3i server gives us no access to this small service console, but there are some down sides to this, as certain things can only be done from the service console. And until VMware builds those missing functionalities into the VC interface you still need to get yourself console access. In the beta versions of 3i there was an option in the advanced settings, but this has been removed in the final releases. VMware has published a knowledge base article that describes how to get console access (this is not officially supported by VMware). In short you just hit Alt-F1 and then type in ‘unsupported’ followed by the root password. The article also explain how to disable this Tech Support Mode, in case you want to.

getting console access on a vmware esxi server

(the password that is asked is the password for root)

Of course you do not want to be in the server room all the time and your server might not have some kind of remote access facility, so the first thing you probably want to do is enable SSH access to your server.
# edit /etc/inetd.conf (using vi)
# remove the # (remark) sign in front of the SSH line
# kill and restart the inetd process (or just reboot your server)

So why do you need console access?
There are multiple reasons why you want to have console access. One of the most common reasons is that you might want to change HBA driver options. To get better performance out of your Qlogic or Emulex HBA most people increase their queue depth (see for instance VMware 100.00 io blog post). To find out what options you can set on your drivers you can use the command vmkload_mod:
# display your loaded drivers: vmkload_mod –list
# display parameters for your driver: vmkload_mod -s /mod/your_driver

Another reason why you definitely still need console access (unfortunately) is if you want to use thin provisioned virtual disks, a new feature in ESX, but for some reason not exposed in the VC interface yet (i think because it is still experimental supported). Any virtual disks created via the normal interface are pre-allocated disks, so a 100GB virtual disk will use 100GB on your VMFS. With thin provisioned disks the actual virtual disk file will start very small and only grow when you will actually need the disk space. Note: this only works for Virtual Disks on iSCSI and FC SAN, not NFS!

With the vmkfstools command you can create new virtual disks as ‘thin’ disks. After you created the disks, you can then use the normal VC interface to add that disk to your VM.

Creating a 100GB thin disk:
vmkfstools -c 100G -d thin /vmfs/volumes/san_vmfs/my_vm/thin_disk.vmdk

If you already have a pre-allocated disk, you can convert it to a thin disk as well. Well it is not really converting, but creating a new copy as thin disk. After you have done that, you will need to remove the old disk from the VM and add the new converted copy.

‘convert’ copy a existing virtual disk to thin format:
vmkfstools -i /vmfs/volumes/san_vmfs/my_vm/large_disk.vmdk -d thin /vmfs/volumes/san_vmfs/my_vm/new_thin_disk.vmdk

Well I am sure there are more reasons why you still want to ‘play’ on the service console. As I grew up with a commodore 64 I always want a command prompt (but I’m glad we lost the tape drive 😉 )

Thanks to www.run-virtual.com for this info.

Move a VM from VMware Server to ESX or ESXi 150 150 Roderick Derks

Move a VM from VMware Server to ESX or ESXi

Objective: Move a VM from VMware Server to ESX or ESXi

Prequisits: root access via ssh to the ESXi or ESX server (read more about how to get ssh access to ESXi)

  1. Make a folder with the name of your host (I used “ventoux” in the example) on your ESX VMFS partition to hold the migrated VM. Copy over the .vmx file, nvram, and everything else but the .vmdk files into this folder.
    # scp  /DATA/vmware/vmmachines/FC7/ventoux/*.vmx* root@10.0.2.31:/vmfs/volumes/VMFS_ESX01_01/telegraph/
    # scp  /DATA/vmware/vmmachines/FC7/ventoux/*.vmsd root@10.0.2.31:/vmfs/volumes/VMFS_ESX01_01/telegraph/
  2. Make a second folder (“ventoux_vmdk”) on your VMFS partition and copy over the .vmdk files.
    # scp  /DATA/vmware/vmmachines/FC7/ventoux/*.vmdk root@10.0.2.31:/vmfs/volumes/VMFS_ESX01_01/ventoux_vmdk
  3. import the vmdks
    # for i in /path_to/folder_containing_vmdks/*.vmdk; do vmkfstools -i /path_to/folder2/$i /path_to/folder_containing_vmx/$i; done
    My command looked like this:
    # for i in /vmfs/volumes/VMFS_ESX01_01/ventoux_vmdk/*.vmdk; do vmkfstools -i /path_to/folder2/$i /vmfs/volumes/VMFS_ESX01_01/ventoux/$i; done
  4. Log into VIC, browse your datastore, go to the folder you created. Right-click on the .vmx file and select add to inventory. That should do it!

Some last notes:

  • Don’t forget to upgrade the virtual hardware from the pull-down menu, if necessary.
  • Also, you may need to re-install ESX’s VMware tools once it’s running. The virtual LAN adapter sometimes doesn’t convert properly. Just delete it out of the VM and re-add it using the VI Client
  • I got this error message when I wanted to edit hthe vm’s properties:
    Unable to find memory information for guest OS. Using legacy defaults.

    Resolution
    You need to ensure the virtual machine has an operating system selected in its settings.
     
    To ensure an operating system is selected:
       1. Right-click on the virtual machine and click Edit Settings.
          The Virtual Machine Properties window opens.
       2. Click the Options tab in the Virtual Machine Properties window.
       3. Select the appropriate guest operating system.
       4. Click OK
           Now virtual machine can be edited without receiving that error message.


Boot VMware ESXi 4.0 4.1 from a USB Flash Drive 150 150 Roderick Derks

Boot VMware ESXi 4.0 4.1 from a USB Flash Drive

Tools required to do the job:

  • At least 1G USB flash drive
  • Virtual CD mounting tool, i.e. MagicDisk
  • WinImage to build the image to USB storage.

Steps to make the bootable ESX Server 3i USB flash drive:

  1. Download ESXi Installable ISO
  2. For 4.0 extract INSTALL.TGZ from the root directory of the ISO image using WINIMAGE the Virtual CD mounting tool
    For 4.1 extract imagedd.bz2 from the root off the ISO to your harddisk using WINIMAGE. (WinRAR gave me problems later on the process)
  3. For 4.0 extract /usr/lib/vmware/installer/VMware-VMvisor-big-3.5.0-xxxxx.i386.dd.bz2 from INSTALL.TGZ
  4. For 4.0 extract VMware-VMvisor-big-3.5.0-xxxxx.i386.dd from VMware-VMvisor-big-3.5.0-xxxxx.i386.dd.bz2
    For 4.1 extract imagedd form imagedd.bz2
  5. Attach the USB flash drive and make sure you no longer need the data on it
  6. Use WinImage to transfer VMware-VMvisor-big-3.5.0-xxxxx.i386.dd to the USB flash drive
    1. Disk->Restore Virtual Hard Disk image on physical drive…
    2. Select the USB flash drive (Warning: If you select the wrong disk you will lose data!)
    3. Select the image file VMware-VMvisor-big-3.5.0-xxxxx.i386.dd or imagedd
    4. Confirm the warning message
    5. Wait for the transfer to complete
  7. Unplug the USB flash drive (Warning: If you forget to unplug the flash drive from the PC you might lose the data on your hard drives the next time you boot!)
  8. Attach the USB flash drive to the machine you want to boot (Warning: If ESX Server 3i recognizes local drives, you might lose the data on it, so make sure you don´t need it anymore or unplug all hard drives!)
  9. Turn the machine on and make sure the USB flash drive is selected as boot device
  10. Enjoy.

Notes:

The physical machine you want to boot from must have the option to make the USB flash drive as the boot device.

You can also watch a tutorial video.

    Your Name (required)

    Your Email (required)

    Subject

    Your Message

      Your Name (required)

      Your Email (required)

      Subject

      Your Message